As requested by /u/funkless_eck@sh.itjust.works, this is a walkthrough of how I set up NGINX Proxy Manager with a custom domain to give me the simplicity of DNS access to my services with the security of Tailscale to restrict public access. This works great for things that you want easy remote access to, but don’t want to have open to the internet in general (unRAID GUI, Portainer, Immich, Proxmox, etc.)
Prerequesites
- A custom domain (obviously, because that’s the whole point of this tutorial)
- A Tailscale account with your devices linked to it
Steps
-
On the server that you want to serve as the entry point into your network, install the NGINX Proxy Manager Docker container (you could absolutely use a different installation method, but I prefer Docker so that’s how this guide will be written)
I. For this, I have a Raspberry Pi that is dedicated to being my network entry. This method is probably overkill for most, but for me it works wonders because I have multiple different devices working as servers and if one goes down I can still access the services hosted on the others.
II. I’m not going to go super in detail here, because there is plenty of documentation elsewhere but you install it the same way you would install any Docker container and follow the first time setup
-
Log into your Tailscale account and get the Tailscale IP for the entry device (ex. 100.113.123.123)
-
Get the SSL information from NGINX Proxy Manager for your domain
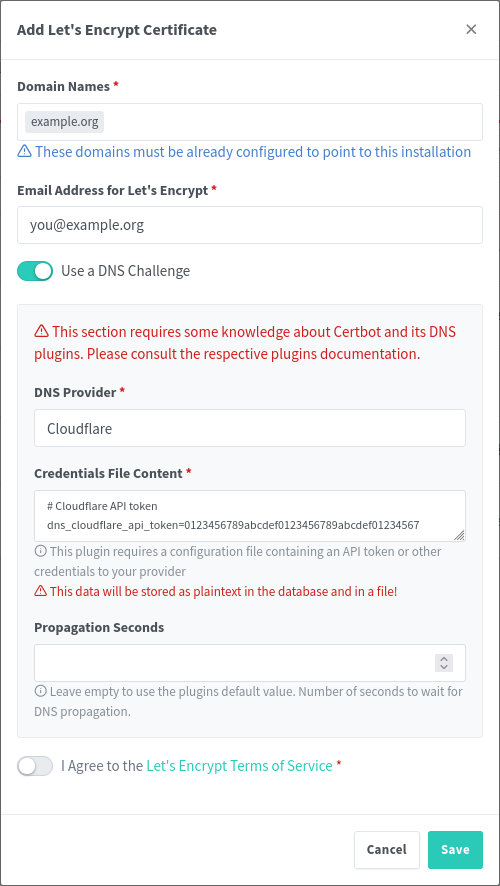
I. Navigate to “SSL Certificates” and then “Add SSL Certificate”

II. Select “Let’s Encrypt”
III. Type in your domain/subdomain name in the first box
IV. Enter your email address for Let’s Encrypt
V. Select “Use a DNS Challenge”
VI. Select your DNS provider in the dropdown
VII. From here, you’re all set for now. We will continue with this later
-
In your domain DNS dashboard, you will need to do a few things (I use Cloudflare, but the process should be more or less the same with whatever provider you use):
I. Set up an A record that redirects the root of your domain (or a subdomain, depending on your configuration) to your Tailscale IP from step 2
II. Set up a wildcard redirect that points back to your domain root. This is important because it will redirect subdomain requests (i.e. service.example.org to your root example.org which then points to the Tailscale IP)

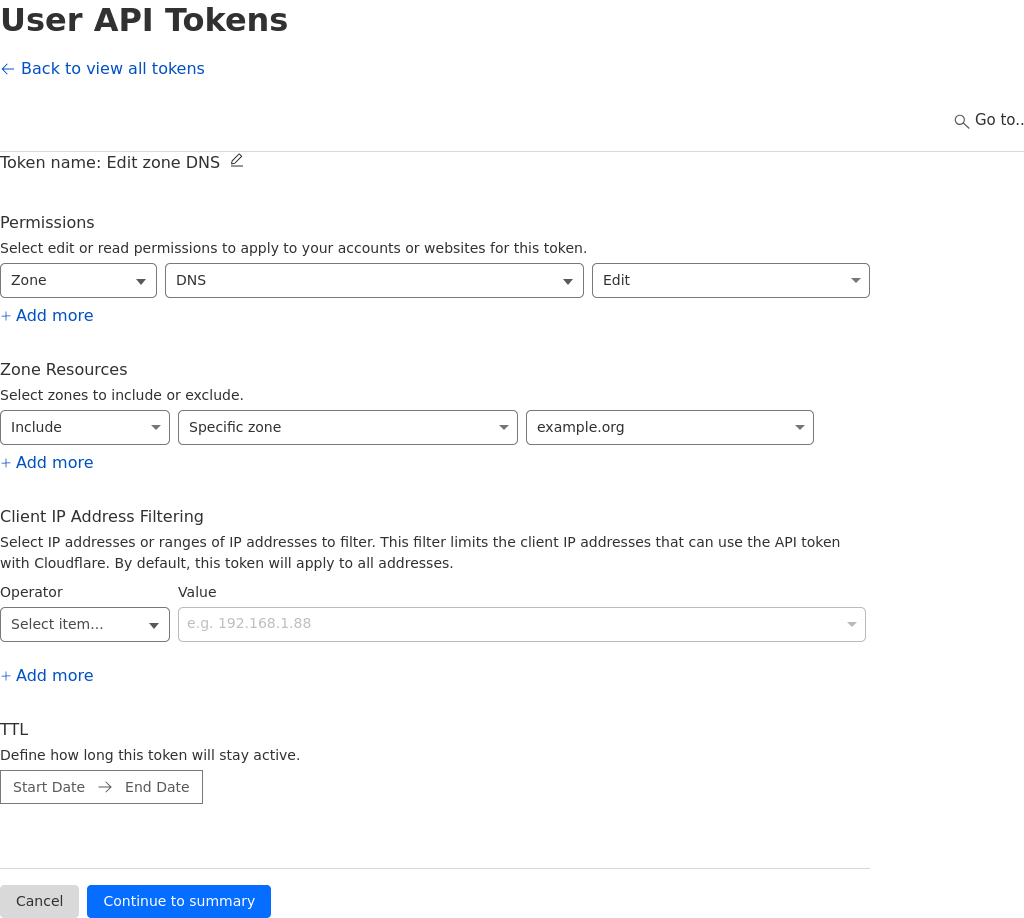
III. (This is going to be dependent on your provider) Generate an API key for NGINX to use for domain verification, this can easily be achieved in the Cloudflare dashboard in the API key section. The key needs to have permissions for Zone.DNS
-
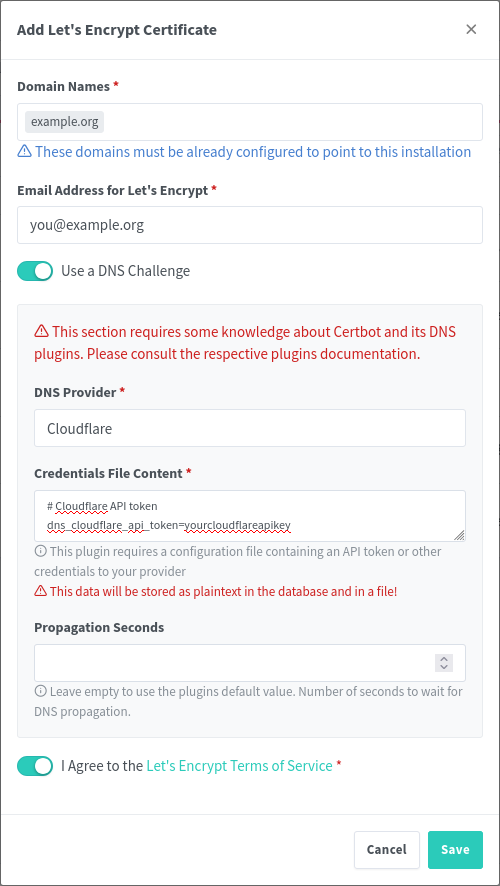
Back in NGINX Proxy Manager, drop in your API key in the text box where it asks for it (you need to replace the sample key).
-
The hard part is done, now it’s just time to add in your services!
Here’s an example of proxying Portainer through NGINX Proxy Manager:
-
Might be obvious, but open up NGINX Proxy Manager
-
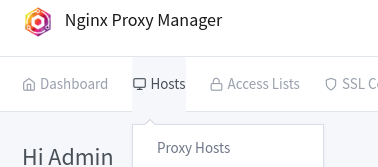
Navigate to Hosts -> Proxy Hosts
-
Click “Add Proxy Host”
-
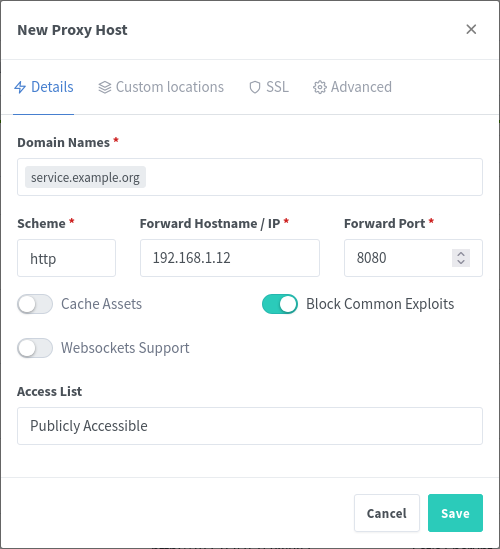
Type in the URL that you want to use for navigating to the host, I prefer subdomains (i.e. portainer.example.org)
-
Type in the IP address and port for the service
I. Here’s the neat part: because NGINX is running in Tailscale, you can connect to both other services in your tailnet or other devices running in your network that don’t necessarily have Tailscale running on them.
II. An example of this, would be if you have two houses (yours and your friends), where you have services deployed at both locations. You can have NGINX reach out through Tailscale to the other device and proxy the service through your main network without needing to set it up twice. Neat, right?
III. Conversely, if you have a server running in your network that you cannot install Tailscale onto (for support reasons, security reasons, whatever), you can just use the internal IP for that device, as long as the device NGINX Proxy Manager is running on can access it.
-
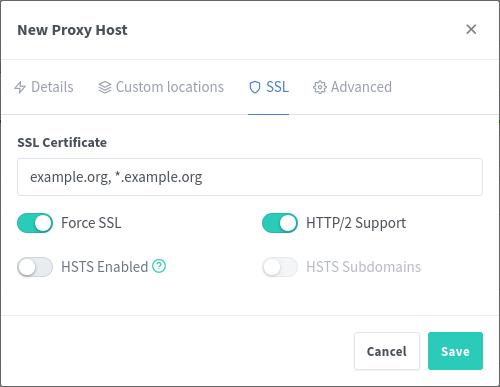
Navigate to the SSL tab of the window, and select your recently generated Let’s Encrypt certificate
-
And you’re done
Now, you can connect your phone or laptop to Tailscale, and navigate to the URL that you configured. You should see your service load up, with SSL, and you can access it normally. No more remembering IP addresses and port numbers! I don’t personally meet this usecase, but this solution could also be useful for people running their homelab behind CGNAT where they can’t open ports easily – this would allow them to access any service remotely via Tailscale easily.
EDIT: The picture formatting is weird and I’m not really sure how else to do it. Let me know if there’s a better way :)
For DNS challenges, I personally prefer using acme-dns. It’s a separate DNS server that only serves ACME DNS challenges. I felt a bit uneasy using an access token for my actual DNS host since it grants full read/write access to every record. acme-dns reduces the attack surface.
Let’s Encrypt follows CNAMEs and supports IPv6-only DNS servers, so you could just run acme-dns on a spare IPv6 address (assuming your internet provider has a static IPv6 range, or you have a VPS with IPv6).
Holy crap thank you so much. I was literally thinking of figuring out how to do exactly this EARLIER TODAY!
Thank you again for this write up. I have almost all of what you wrote already done (cloudflare, NPM and tailscale setup) but haven’t hooked Tailscale and NPM together yet.
🫡 just doing my part, when i set it up it was a lot of digging through documentation and videos (the information is there, but it definitely requires some commitment in the research lol). Wanted to make something that gives it all in one go & helps the community out :)
Honestly, this is probably the enhancement to my homelab which has yielded the greatest QoL improvement. Prior to this, I would have to remember port numbers for every service and every ip address that i have something running on (and as my lab has expanded, this has become a lot more challenging).
A good dashboard helps with not remembering port numbers also. And can look slick
That does work great, but when I’m on mobile i find it a lot easier to just go straight to the service rather than using a dashboard (although i have one set up)
What a write up, thank you for documenting this.
I understand a lot of people in this hobby do it professionally too, so a lot is assumed to be common knowledge us outsiders just don’t have.
While my system of using tailscale’s magic dns to use lxc:port works fine for my fiancée and I, expanding this a family wide system would prove challenging.
So this guide is next step. I could send my fiancée to <home.domain.xyz> and it’ll take her to homarr, or <jellyseerr.domain.xyz>
The ultimate dream would be to give family members a pi zero and a <home.domain.xyz> and then run a family jellyfin/immich.
Glad to help, yes that is a perfect example of how you could use this to your benefit. Much easier to just tell people to enable VPN (tailscale) and navigate to an easy to remember URL.
I’m somewhere in the middle, I do cybersecurity professionally so i work a lot with technical stuff but my hobbies are much deeper in it so theres a lot of stuff i don’t know. But, thanks to these communities i was able to learn how to do a lot of things and have now levelled up into doing the research on my own and trying to give back :)
In your dream scenario, is that each family member would be hosting immich/jellyfin on their pi zero? Or is the pi zero somehow routing traffic for them back to your server for jellyfin and immich?
Oh, routing, I remember watching an “off site back up” video where they set up IP tables, or IP forwarding, or some such, so when their parents tried to access jellyfin locally it was routed over tailscale. Maybe I’m misremembering though, I’m not confident enough to start thinking about it seriously, so I logged it as “that’s possible” and moved on.
That way I just have to keep one instance of jellyfin/immich/etc up to date. It’s all a bit beyond my ken currently but it’s the way I’m trying to head. At least until I learn a better way.
Ideally, I give someone a pi all set up. They plug it in go to service.domain.xyz and it routes to me. Or even IP:Port would be fine, I’ll write them down and stick it to their fridge.
My parents and I run each others’ off-site back up (tailscale-syncthing), but their photo and media services are independent from mine. I just back up their important data, and they return the favour, but we can’t access or share anything.
Guides like yours are great for showing what’s possible. I often find myself not knowing what I don’t know so don’t really know where to start learning what I need to learn.
Ahhh i gotcha, so basically it forwards traffic through the pi so that you can send traffic through tailscale on devices that don’t support it? Sounds like a cool idea tbh
Good on ya for the tailscale/syncthing though, off-site backups are super important! If Jellyfin supported federation you could merge your library and your parents library and have it all accessible through each of your local instances. Maybe one day they’ll add it, i think it would be a killer feature.
Glad the write-up helped though, it should at least help you move towards single instances (at least for immich) since you can just backup on tailscale via the dns entry!
I think Tailscale also has the option to open certain tailscale IPs to public so if you have some service you’d like to share, you can use the same process but anyone could access it (maybe a small self hosted site)
Interesting, i didn’t know that but that is definitely something worth looking into if you need it for your usecase:
https://tailscale.com/kb/1223/funnel
Personally, I use a cloudflare tunnel for that. I’ll probably end up checking out tailscale funnel at some point for fun though
Great write up, thanks. For video learners, Wolfgang does a good step-by-step on YouTube
For 4 II, its CNAME Name: @ Target: ???
What is the target supposed to be?
Edit: putting “@” for name on the A record, once saved, it changes to my domain instead of @, in your screenshot
Yes, that is the intention. I suppose I probably could have just edited it to read ‘example.org’. But, it’s the shorthand notation @ refers to your domain name.
So the A record @ -> [Tailscale IP]
which DNS translates to example.org -> [Tailscale IP]
Cool okay.
What about the CNAME one?
Same thing,
CNAME: * -> @
Which translates to: * -> example.org
* Is a wildcard DNS character, basically meaning any subdomain will get forwarded to the root domain
deleted by creator
Where? All the keys in the screenshots are sample keys
First SS: its 01234456789abcdef repeated Second SS: it just says yourapikeyhere
Yeah never mind
My big question…will this work on blocked locations, as in a router running behind cgnat? No open ports. Does Tailscale solve this?
Thanks!
To my understanding, yes! I touched on it in the post but since tailscale is a VPN that doesn’t require open ports to access other devices in the tailnet, you don’t need to worry about CGNAT
This is great news! I have some small project I’ll be taking in a location with cgnat, I’ll be visiting it in November. This will be of great help, thanks so much!
Happy to help!
Side note, if you want to make publicly available services, you could use cloudflare tunnels. They work in a similar way – letting your services be accessible over the Internet without needing to open ports. Some other people in the comments have mentioned that Tailscale funnel can also work for this, but i haven’t used it so I can’t really advise on that front
deleted by creator
Just looked it up, seems to pretty cool. Does it only work with one service though? You proxy one port to your tailscale domain name, but does it do routing for additional ports at the same time?
I’ve only done surface level research into it, and honestly didn’t come across this when i was doing the research for NGINX Proxy Manager, but it seems a little limited in comparison.
Happy to be proven wrong though, any easy solution is a good solution :)
deleted by creator


